
Thursday, April 22, 2010
Black Lace = Sexy?
So I thought I'd try something different by adding lace to a cake. I thought the lace would make the cake look "sexy", but the whimsical-ness of the flowers won this battle. This cake was for a 25th birthday. So, so much more to learn!

Wednesday, April 14, 2010
Mario Karting
The bf loves Mario Kart. The bf loves cake. Logic might lead one to believe that the bf loves Mario Kart Cake. Toad is a bit rough, but this is my first fondant figure. I will get better.
Lemon cake with raspberry filling and lemon buttercream. Will pair nicely with vanilla ice cream...MMmmmm :) Happy (early) birthday, Jamarr!


Lemon cake with raspberry filling and lemon buttercream. Will pair nicely with vanilla ice cream...MMmmmm :) Happy (early) birthday, Jamarr!


Sunday, April 11, 2010
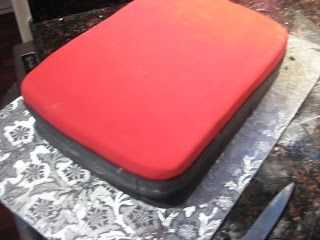
BlackBerry Curve Cake
I made this cake for a client's and her grandmother's birthday. The cake was red velvet with vanilla buttercream. It's pretty good, right?

I took pictures of the process this time!
First, I made the keys:

Then, I baked, assembled and carved the cake:

Next, I iced it in buttercream and covered it in fondant:

And finally, I decorated it!


I took pictures of the process this time!
First, I made the keys:

Then, I baked, assembled and carved the cake:

Next, I iced it in buttercream and covered it in fondant:

And finally, I decorated it!

Sunday, April 4, 2010
Happy Kappa-versary!
Today is my dear bf's five-year Kappa-versary. To celebrate, I made him this custom red velvet cake. He absolutely loved it!


Monday, March 1, 2010
Faux-Professional Pictures, Anyone?
I recently came to the conclusion that I needed better pictures of my cakes. There's nothing like a crumb-covered counter top to lend to the authenticity of my cakes; however, I think clients will respond better to great photos. So what did your girl do?? I created a homemade light box, or "photo stage", for my work.


With the Light Box

Ahh, I impress myself sometimes :-D

This is just a cardboard box with the sides cut out and replaced with wrapping tissue. The tissue-covered "windows" allow for the light coming from the two lamps flanking the box to be diffused into the box. The baby shoes are sitting on a white poster board, or the "stage". See the before and after pictures of the gum paste baby shoes below.
Without the Light Box

With the Light Box

After a bit of photo editing

Ahh, I impress myself sometimes :-D
Saturday, February 27, 2010
Whimsical February Wedding
This cake is for a friend/client who is getting married today (congratulations, Thoko!). It's a 12"-9"-6" three-tier cake frosted in buttercream. The top and bottom tiers are yellow cake with strawberry buttercream filling, and the middle tier is chocolate with vanilla buttercream. The bride didn't want a super-traditional cake, so we decided that the whimsical rope design was the way to go. I really hated that I could not get the edges of the cake smoother, but I will definitely figure that out before the next buttercream-finished cake comes around. Now, wish me luck with delivering this cake as I have to drive it over an hour away!


Sunday, February 21, 2010
Tiffany Box Cake SANS Shoe
A client ordered a Tiffany box cake plus gum paste shoe for her friend's surprise birthday. Remember the shoe? Good. So how come it BROKE as I was putting the cake in the car!!!! I was mortified! Below are two pictures: I took the first one at home and the second one at the party venue. It took me soooo long to make that stupid shoe! Oh well. Maybe next time.
Before the shoe debacle

After the shoe debacle

Monday, February 8, 2010
A Diva Wears Prada
Well, this shoe isn't a Prada design. It's actually a Cake Princess original. A client wanted a stiletto shoe made for her friend's birthday cake. Apparently, the friend is a shoe wh*ore, so the shoe was a must. Yes, those are rhinestones on the ankle strap! All the design inspiration came from within :) I hope she likes it! (This is a 100% edible shoe, fyi.)


Tuesday, January 26, 2010
Baby Shoes
I'm making a cake for a baby shower next weekend, so I made the baby shoes in advance (sans shoestrings) and thought I'd share.


Monday, January 18, 2010
First Tasting
Sooooo, I had my first tasting / consultation on Saturday and it went very well! I made three flavors of cake for the potential client (she brought her mom - awww) and colored the frosting to reflect her wedding colors. I took a bunch of notes on what she wants for her wedding (in May) so that I could get everything right in the order form. I then sent the bride-to-be on her way with a box of goodies so she and her fiancee could make a final decision.


The very next morning, the client wrote this email to me:
"Thanks so much for all the effort that you put into yesterday! We really loved meeting with you and your CAKE!! You are extremely talented and I feel extremely fortunate to have found/met you! My dad & finance, Ken, both enjoyed the cupcakes as well. :) Needless to say, we would love to move forward and get you a deposit to be able to secure the date!"
I
I'd say I'm making progress :)
Sunday, January 10, 2010
My New Logo (As if I had an old one)
I figured if I am going to start marketing myself and selling my cakes, I needed a logo. Some advanced Powerpoint skills and a lack of design experience yielded me this logo:


Saturday, January 9, 2010
Spring Wedding Cupcakes
I have my very first tasting scheduled for next Saturday. The potential client wants 150 cupcakes and an 8" round cake for her wedding. I've never made more than 2 dozen cupcakes at a time, so that will be a challenge. But I have to win the business first! The client's wedding colors are Tiffany blue and green. Practice cupcakes below.

(I especially like to two-toned one on the bottom right!)

(I especially like to two-toned one on the bottom right!)
Saturday, December 26, 2009
Diva Cake = DONE!
I finished the birthday cake I'd planned to make. The top tier gave me soo much trouble. I still have to transport it to the venue, so all's not finished yet. I hope the birthday girl loves it!

My Cake

The Video
Wednesday, December 23, 2009
Shooting Stars
In order to make my much anticipated "Diva" cake, I had to make the "shooting" stars. I was bored at my bf's house while he was at work, so I made a tutorial. No, seriously, I think I'm getting hooked on making YouTube videos. I simply sat down to make the stars (since they needed to be made in advance anyway) and thought to myself, "Hmmm, I bet I could make a useless video!" So, here it is. Enjoy!
Saturday, December 19, 2009
Simple Daisy Cake
I went to visit my friend Michelle and she wanted me to teach her how to make a fondant cake. This is the cake we ended up creating.


The cake is simple, but remember that I was not in my own (fully equipped, mind you) kitchen. We bought a couple of 9" pans, some red food coloring, a pixie fondant cutter, and ingredients for homemade buttercream and fondant. I have to give a shout out to Michelle for all of her hard work. She did an amazing job!
P.S. Michelle, you'll always have a job in my bakery (whenever I open it :-D)
Wednesday, December 16, 2009
Decorated!
I decorated my practice cake today! I think it came out pretty well. The actual cake will replicate the first three layers of the inspiration cake, but the practice cake was two layers for simplicity. I learned alot from this dry run since this is my first time making such a cake.
The Cake

***************
The Video
Tuesday, December 15, 2009
Bling! Bling!
Remember that hand made monogram cake topper I told you about?? Well, I made it last night! I printed out the monogram letter from the internet, taped it to a 5" by 7" piece of aluminum flashing, cut the letter out with kitchen shears, and "bedazzled" it with gems and jewelry glue from Michael's. Below is the finished product. Next time, I will use smaller, same-sized gems for a neater, more uniform look.

Cake Topper for Diva Cake

Sunday, December 13, 2009
Experimenting with Marshmallow Fondant (MMF)
Since I wanted to do a practice cake and didn't want to use my $17 tub of Satin Ice fondant, I decided to try and make my own. It was a sticky mess, but the fondant turned out fabulous! I got the recipe and instructions from a You Tube tutorial. I let the fondant rest over night and applied it to the cakes this evening. I was pleased with the texture and taste of the fondant, and it rolled out like a charm! I will definitely be making this again!
Below is a picture (taken with camera phone, so low quality) of my trial topsy-turvy cake. I did 6" and 8" tiers, but I didn't like the size combo (not enough space on bottom tier), so I've decided to revise my original plan (10", 8" and 6" tiers) and do 14", 10" and 6" tiers so that I will have more space. I need to make sharper edges when smoothing the fondant and taper the cake more, too. I didn't get to carve the top tier into a topsy-turvy shape because I didn't remeber to carve it before icing it. Oh well.

Also, I learned how to do the topsy-turvy cake from a You Tube tutorial.
Saturday, December 12, 2009
Diva Birthday Cake
About a month ago, I agreed to make a diva-esque cake for a friend's birthday. The cake I plan to make is based on a design done by Pink Cake Box.

The Revised (well, sort of - tier sizes revised)
 As you can see, the inspiration cake is a four tier, topsy-turvy cake. I plan to do the first three layers only, but instead of putting my friends age on top, I will make a "bedazzled" monogram cake topper. The party is Saturday, December 26, so I've got about two weeks to get everything together. Not only that, I live on the east coast and the party is in Chicago! I have sooo much stuff to lug on the plane with me! I plan to make homemade marshmallow fondant, the stars, and the monogram in advance. I have access to a KitchenAid stand mixer and a well equipped kitchen in Chicago, so I think I can pull it off. I'm also going to make a practice cake in advance because I've never made a topsy-turvy cake before! Wish me luck, because I need it!
The Inspiration
The Revised (well, sort of - tier sizes revised)

Friday, December 11, 2009
Recent Cakes
Here are two cakes I've done in the last two weeks.

Cake for my coworker, Kim (duh?)

Cake for office gift exchange (I won best gift!)

Cake for my coworker, Kim (duh?)
From Peasant to Princess
I started dabbling in cake decorating about a year ago, but I've really stepped it up in the last month. I'm nowhere near where I'd like to be, but I'm willing to put forth the work and dedication to earn the title of "Cake Artist". I have ABSOLUTELY NO formal culinary arts training (but I did work at McDonalds and Burger King when I was a teenager, hehe), so I'm learning everything as I go. My two biggest resources are Cake Central and various YouTube videos. I want to share my experiences with you as I transition from the Cake Peasant to the Cake Princess!
Subscribe to:
Posts (Atom)